Saturday, April 10, 2010
We all miss one of the great awaited feature of how to set invisible status in gtalk. Just like yahoo messenger invisible status in gtalk will allow you to be online without being bugged by gtalk friends when you are at work or don’t feel like to be annoyed by your gtalk friends.
But the regular gtalk version provided by google does not allow you to be in invisible mode when you are logged in.
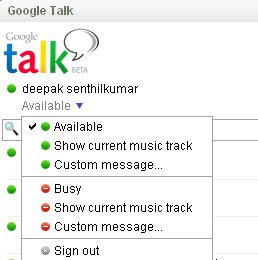
gtalk-modes
As seen in the image above you can either set your gtalk to busy, show current music track or any custom message as your gtalk status message.
Invisible In Google Talk With Google Talk Labs Edition
In order to get invisible with gtalk only then you need to install a some what different version of gtalk called gtalk labs edition.
What is Gtalk Labs Edition?
Google Talk, Labs Edition is an experimental release of the Google Talk client. It has many of the same great features as the Google Talk Gadget, including instant messaging, emoticons, and group chat. Google Talk Labs Edition also includes new desktop notifications from Gmail, Calendar and Orkut.
You will need to first download gtalk labs edition from here, and install it.
After running and logged in to gtalk labs edition, you will find the option to set your status to invisible mode.

gtalk labs edition-modes
But google talk labs edition is not as good as google talk!
Create Desktop Shortcut To Chat With Your Favorite Gtalk Buddies
0 comments Posted by Deepak at 1:53 PMA useful trick for google talk users, which allows you to create desktop shortcuts for launching the chat window.
For example, I frequently chat with some person xyz@gmail.com in google talk, so every time I want to chat with him I would need to search and type his name or gmail id in search bar or you can also enable to see all online contacts by enabling the scrollbar.

So, if you don’t want to search every time the same person you frequently chat, you can create desktop shortcuts with the following target paths.
gtalk:chat?jid=xyz@gmail.com [starts a chat]
gtalk:call?jid=xyz@gmail.com [starts a call]
Tuesday, April 6, 2010
What to do when something has happened such that her shutdown screen in Windows XP has changed from the screen with typical "three choice buttons" (standby, turn-off, restart) to a mini-window with some sort of drop down menu?
How to change back to the old windows shutdown screen?
Still can't get hold of the question?
Look at the following pictures.
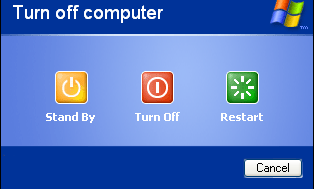
Screen 1

Screen 2
How to change shutdown screen from screen 2 to screen 1?
Go to Control Panel and double click the User Accounts icon.
This should launch the User Accounts applet.
In User Accounts, have your friend click on "Change the way users log on or off".
On the next page, make sure that "Use the Welcome screen" is checked. "Use Fast User Switching" can be checked if your friend wants to enable that option.
Click on the Apply Options button.
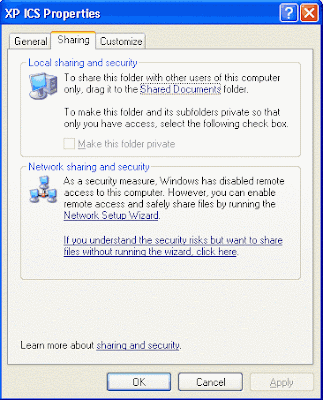
Windows XP lets you share a computer's disks and folders with other computers on the network, using a method called Simple File Sharing. And it really is simple. If a disk or folder is shared, everyone on the network can access it. There are no user permissions and no passwords. Because sharing in this way is so wide open, Windows XP tries to protect you from some potential security risks.
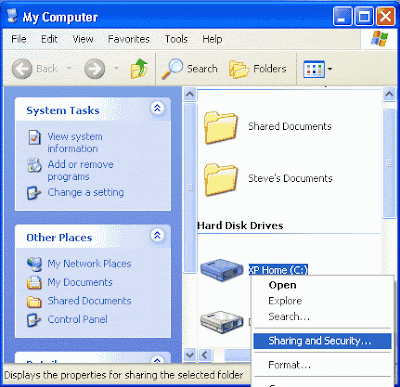
Right click the disk or folder that you want to share and select Sharing and Security.
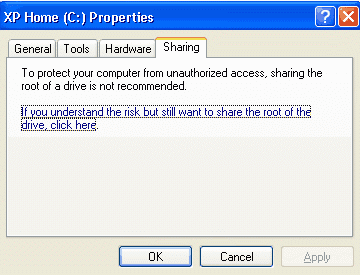
The disk or folder that you share, along with all of the folders that it contains, will be accessible by other network users. If you're sharing an entire disk, Windows XP gives a warning. The implication of the warning is that it's better to share a specific folder, since only that folder (and its subfolders) will be accessible by others, and the rest of the disk will be inaccessible. Click where indicated if you want to go ahead and share the entire disk. This screen doesn't appear if you're sharing a folder.
The first time that you set up sharing, Windows XP displays a warning, urging you to use the Network Setup Wizard for safety. Click where indicated to either run the Wizard or to do it yourself.
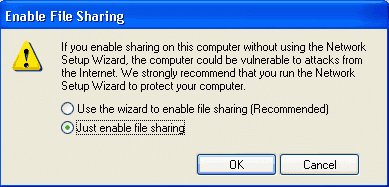
What great secret does the Wizard know that XP thinks you don't? The Wizard automatically enables the Internet Connection Firewall (ICF) to prevent other Internet users from accessing your shared disks and folders. If you have Service Pack 2 installed, the built-in Windows Firewall should already be running automatically, unless you turned it off.
XP displays another warning. If you want the firewall enabled, select Use the wizard to enable file sharing. Otherwise, select Just enable file sharing.
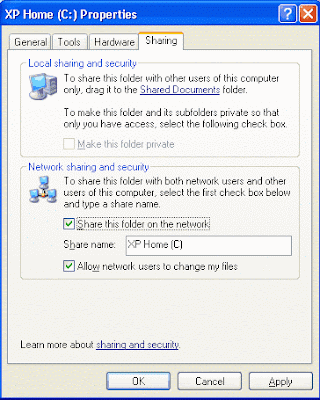
Having successfully run the Wizard's obstacle course, you may now specify a Share name, which users on other networked computers will use to access this disk or folder. For maximum compatibility with all versions of Windows, use 1-12 characters.
By default, users on other computers have full access: they can read, write, and delete shared files. If you only want them to be able to read files, un-check Allow network users to change my files.
Warning: If a user has full access, deleting a file doesn't put it in the Recycle Bin. Once it's deleted, it's gone for good.
Hiding a Shared Disk or Folder
What if you don't want everyone on the network to be able to access a shared disk or folder? For example:
Right click the disk or folder that you want to share and select Sharing and Security.

The disk or folder that you share, along with all of the folders that it contains, will be accessible by other network users. If you're sharing an entire disk, Windows XP gives a warning. The implication of the warning is that it's better to share a specific folder, since only that folder (and its subfolders) will be accessible by others, and the rest of the disk will be inaccessible. Click where indicated if you want to go ahead and share the entire disk. This screen doesn't appear if you're sharing a folder.

The first time that you set up sharing, Windows XP displays a warning, urging you to use the Network Setup Wizard for safety. Click where indicated to either run the Wizard or to do it yourself.
What great secret does the Wizard know that XP thinks you don't? The Wizard automatically enables the Internet Connection Firewall (ICF) to prevent other Internet users from accessing your shared disks and folders. If you have Service Pack 2 installed, the built-in Windows Firewall should already be running automatically, unless you turned it off.

XP displays another warning. If you want the firewall enabled, select Use the wizard to enable file sharing. Otherwise, select Just enable file sharing.

Having successfully run the Wizard's obstacle course, you may now specify a Share name, which users on other networked computers will use to access this disk or folder. For maximum compatibility with all versions of Windows, use 1-12 characters.
By default, users on other computers have full access: they can read, write, and delete shared files. If you only want them to be able to read files, un-check Allow network users to change my files.
Warning: If a user has full access, deleting a file doesn't put it in the Recycle Bin. Once it's deleted, it's gone for good.

Hiding a Shared Disk or Folder
What if you don't want everyone on the network to be able to access a shared disk or folder? For example:
- Mom, Dad, and Junior each have a computer.
- The computers are networked so that everyone can share a cable modem Internet connection.
- Mom and Dad share a folder that stores the family's financial data.
- They don't want Junior to see the folder or the data.
The answer is to create a hidden share by adding a dollar sign ('$') to the end of the share name. A hidden share doesn't appear in My Network Places or Network Neighborhood on any of the networked computers. In order to access a hidden share you need to already know the name of it.
Warning: Using hidden shares is a good way to keep their contents out of the hands of casual users, but a determined individual using certain techniques and/or utilities will be able to detect them. Therefore, you should not rely on hidden shares to provide security for any truly sensitive data.
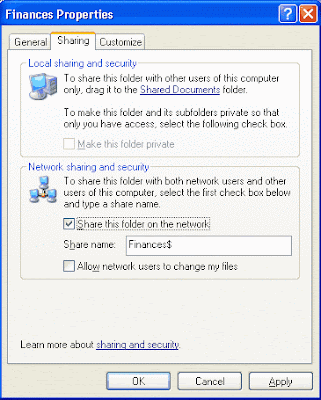
To create a hidden share, right click the disk or folder and select Sharing and Security.
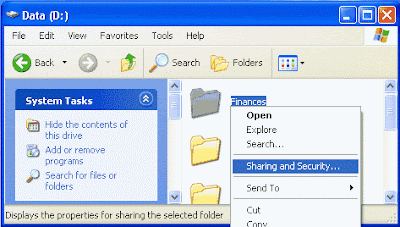
Specify a share name that ends with a dollar sign. Once again, use 1-12 characters (1-11 before the dollar sign). If Junior is clever enough to guess a name like Finances$, use a more secure name, like a combination of letters and numbers. Just make sure that Mom and Dad can remember it, and don't write it on a yellow sticky note attached to the monitor!
Accessing a Hidden Share
A hidden share doesn't appear on any of the networked computers, so how can someone on another computer access it? The answer is to map it as a network drive, which assigns a drive letter to the hidden share. Once it has a drive letter, you access it just like a disk on the same computer.
To map a network drive, open My Computer, click Tools, and select Map Network Drive.

Specify an unused drive letter and enter the network path for the hidden share, being sure to include the dollar sign. If you check Reconnect at logon, the mapping will happen automatically every time you start your computer. Otherwise, you'll have to map it manually every time.
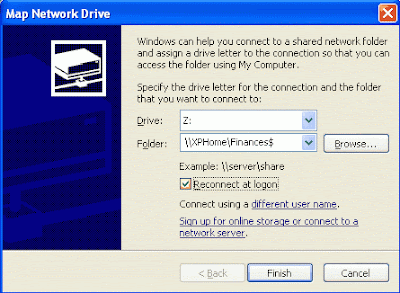
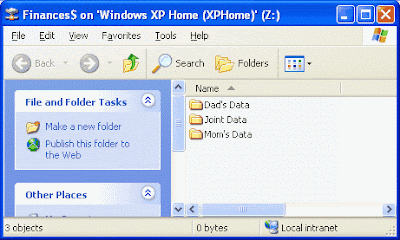
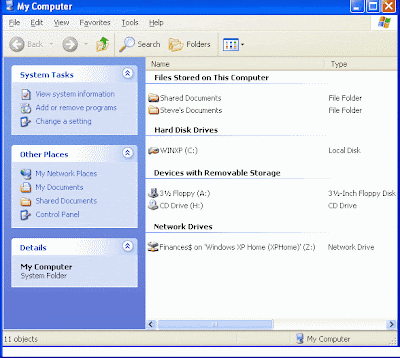
Click Finish. The mapped drive is connected and appears in a new window. It's also available in My Computer.
You can also access it using Start--->Run---> \\XPHome
*XPHome should be replaced by the name of your computer
Warning: Using hidden shares is a good way to keep their contents out of the hands of casual users, but a determined individual using certain techniques and/or utilities will be able to detect them. Therefore, you should not rely on hidden shares to provide security for any truly sensitive data.
To create a hidden share, right click the disk or folder and select Sharing and Security.

Specify a share name that ends with a dollar sign. Once again, use 1-12 characters (1-11 before the dollar sign). If Junior is clever enough to guess a name like Finances$, use a more secure name, like a combination of letters and numbers. Just make sure that Mom and Dad can remember it, and don't write it on a yellow sticky note attached to the monitor!

Accessing a Hidden Share
A hidden share doesn't appear on any of the networked computers, so how can someone on another computer access it? The answer is to map it as a network drive, which assigns a drive letter to the hidden share. Once it has a drive letter, you access it just like a disk on the same computer.
To map a network drive, open My Computer, click Tools, and select Map Network Drive.

Specify an unused drive letter and enter the network path for the hidden share, being sure to include the dollar sign. If you check Reconnect at logon, the mapping will happen automatically every time you start your computer. Otherwise, you'll have to map it manually every time.

Click Finish. The mapped drive is connected and appears in a new window. It's also available in My Computer.
You can also access it using Start--->Run---> \\XPHome
*XPHome should be replaced by the name of your computer


Subscribe to:
Posts (Atom)