Sunday, January 8, 2012
If you are able to connect to a LAN but not to the Internet and if your network manager freaks you showing that you have Limited connectivity.
Here is the solution...
1. Use other static DNS
a. Click "Start" menu, type "ncpa.cpl" (without quotation marks) in Search Box and press "OK".
b. Select your local network.
c. Click Properties, then select Internet Protocol (TCP/IP).
d. Click Properties.
e. In the Internet Protocol window, let's change the "Preferred DNS server" to 208.67.222.222
f. Click 'OK' twice to complete the modification.
If the issue persists, please repeat the steps and change the "Preferred DNS server" to 208.67.220.220.
2. Put the machine in another Wireless network and check whether it can access Internet normally. If so, I suggest you replace another encryption type for a test, such as WEP.
3. Reset WinSock
a. Click Start, click "All programs", and click "Accessories".
b. Right-click "Command Prompt", and click "Run as administrator". If you are prompted for an administrator password or confirmation, type the password or provide confirmation.
c. Please enter the following command, and press Enter.
Netsh winsock reset
d. A message stating "Successfully reset the Winsock Catalog" will appear. Please restart the computer.
Source: http://social.technet.microsoft.com/Forums/en-US/w7itpronetworking/thread/a849e5f7-e770-4ff1-b58b-7414797980db/
Labels: Windows corner...
Wednesday, April 21, 2010
Solution for windows users when grub loader displays error 17
0 comments Posted by Deepak at 4:12 PM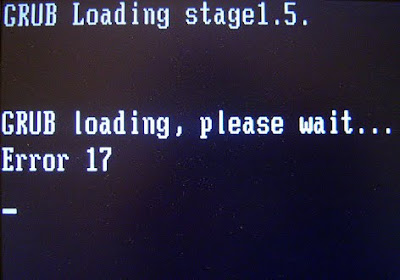
The error that tormented me
You can simply follow my previous post. But what if you don't have the windows xp cd?
As an HP customer, I was not provided with windows xp boot cd (I had to copy a windows xp boot from my friend). Instead I was provided only with the recovery cd! So I made a stop gap solution by making a simple boot cd.
Download this file and unzip it. Then follow the procedures in readme.txt.
Another very simple solution is to reinstall Ubuntu :-P!
Labels: Grub loader, Windows corner...
How to get rid of the grub loader and replace it with boot loader(Windows default loader)?
0 comments Posted by Deepak at 4:05 PM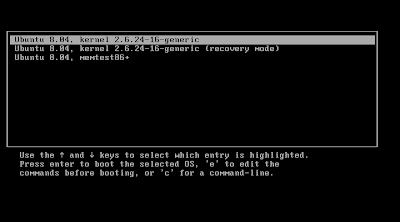
No more torture with this screen!!!
Insert the XP boot cd.
Press R when prompted, it opens the cd in recovery mode.
Use the following commands:
FIXBOOT C:
FIXMBR
BOOTCFG /rebuild
I noticed that i ended up with a second instance of "Microsoft Windows XP Professional" in the NTLoader when I start up. But that can be corrected by editing the boot.ini file in Windows.
Labels: Grub loader, Windows corner...
Monday, April 19, 2010
rundll32.exe powrprof.dll,SetSuspendState
This command will do the job for you.
To even further simplify this you can put those commands in a batch file. So instead of typing the whole command each time you can use shorter commands.
Make sure the batch is put in the %systemroot%\system32 directory so the command will execute from anywhere.
Here is a example. I created hiber.bat in %systemroot%\system32, within that bat file is
cls
echo System will Hibernate!
pause
rundll32.exe powrprof.dll,SetSuspendState
exit
The pause is used so that you can use ctrl+c to break before the hibernate command command is executed. This can be handy when you switch your minds faster than the whirlwind!
Now anytime just type hiber in the command prompt to hibernate your system!
Labels: Windows corner...
Here is the command to do that
at 07:54 rundll32.exe powrprof.dll,SetSuspendState
Labels: Windows corner...
Sunday, April 18, 2010
To shutdown when no other process is running, use:
at 07:54 shutdown -s
To shutdown when other processes are running, use:
at 07:54 shutdown -f
This command forces the exes to close!
Labels: Windows corner...
Tuesday, April 6, 2010
How to change back to the old windows shutdown screen?
Still can't get hold of the question?
Look at the following pictures.

Screen 1

Screen 2
How to change shutdown screen from screen 2 to screen 1?
Go to Control Panel and double click the User Accounts icon.
This should launch the User Accounts applet.
In User Accounts, have your friend click on "Change the way users log on or off".
On the next page, make sure that "Use the Welcome screen" is checked. "Use Fast User Switching" can be checked if your friend wants to enable that option.
Click on the Apply Options button.
Labels: Windows corner...
Right click the disk or folder that you want to share and select Sharing and Security.
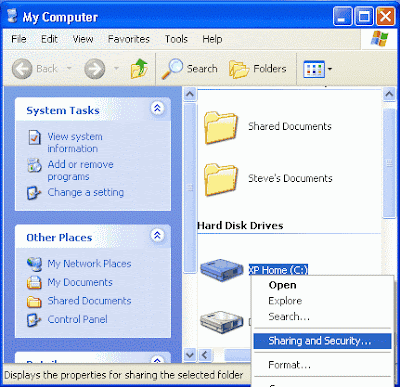
The disk or folder that you share, along with all of the folders that it contains, will be accessible by other network users. If you're sharing an entire disk, Windows XP gives a warning. The implication of the warning is that it's better to share a specific folder, since only that folder (and its subfolders) will be accessible by others, and the rest of the disk will be inaccessible. Click where indicated if you want to go ahead and share the entire disk. This screen doesn't appear if you're sharing a folder.
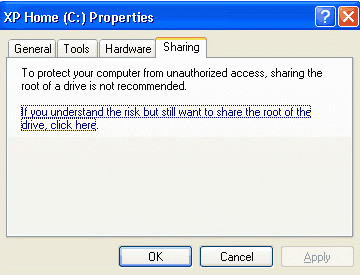
The first time that you set up sharing, Windows XP displays a warning, urging you to use the Network Setup Wizard for safety. Click where indicated to either run the Wizard or to do it yourself.
What great secret does the Wizard know that XP thinks you don't? The Wizard automatically enables the Internet Connection Firewall (ICF) to prevent other Internet users from accessing your shared disks and folders. If you have Service Pack 2 installed, the built-in Windows Firewall should already be running automatically, unless you turned it off.
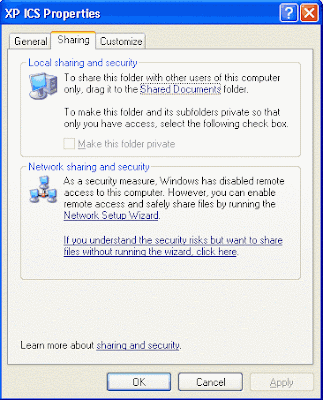
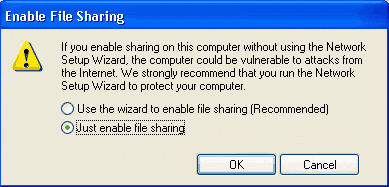
XP displays another warning. If you want the firewall enabled, select Use the wizard to enable file sharing. Otherwise, select Just enable file sharing.
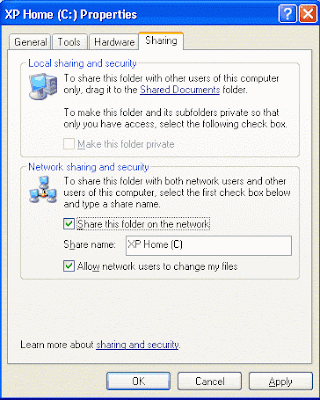
Having successfully run the Wizard's obstacle course, you may now specify a Share name, which users on other networked computers will use to access this disk or folder. For maximum compatibility with all versions of Windows, use 1-12 characters.
By default, users on other computers have full access: they can read, write, and delete shared files. If you only want them to be able to read files, un-check Allow network users to change my files.
Warning: If a user has full access, deleting a file doesn't put it in the Recycle Bin. Once it's deleted, it's gone for good.
Hiding a Shared Disk or Folder
What if you don't want everyone on the network to be able to access a shared disk or folder? For example:
- Mom, Dad, and Junior each have a computer.
- The computers are networked so that everyone can share a cable modem Internet connection.
- Mom and Dad share a folder that stores the family's financial data.
- They don't want Junior to see the folder or the data.
Warning: Using hidden shares is a good way to keep their contents out of the hands of casual users, but a determined individual using certain techniques and/or utilities will be able to detect them. Therefore, you should not rely on hidden shares to provide security for any truly sensitive data.
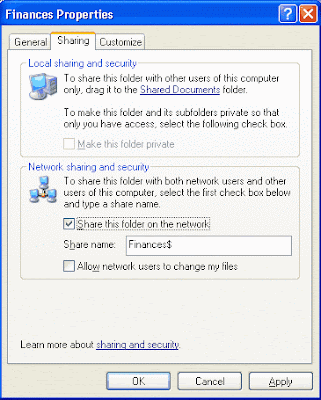
To create a hidden share, right click the disk or folder and select Sharing and Security.
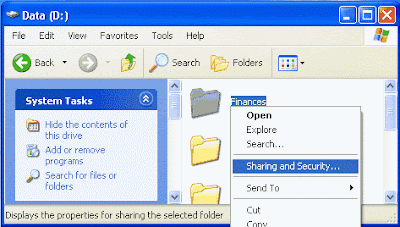
Specify a share name that ends with a dollar sign. Once again, use 1-12 characters (1-11 before the dollar sign). If Junior is clever enough to guess a name like Finances$, use a more secure name, like a combination of letters and numbers. Just make sure that Mom and Dad can remember it, and don't write it on a yellow sticky note attached to the monitor!
Accessing a Hidden Share
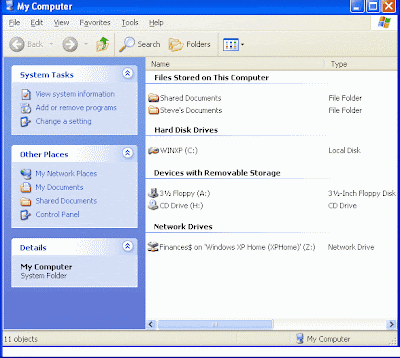
A hidden share doesn't appear on any of the networked computers, so how can someone on another computer access it? The answer is to map it as a network drive, which assigns a drive letter to the hidden share. Once it has a drive letter, you access it just like a disk on the same computer.
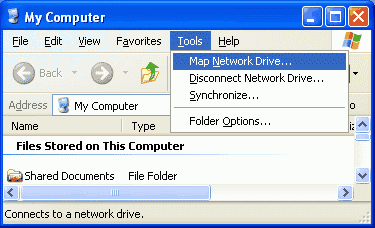
To map a network drive, open My Computer, click Tools, and select Map Network Drive.
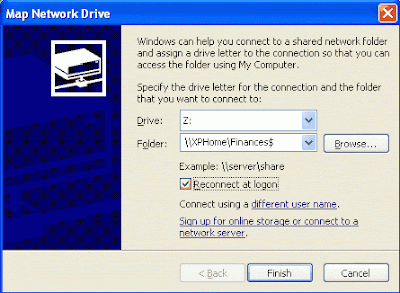
Specify an unused drive letter and enter the network path for the hidden share, being sure to include the dollar sign. If you check Reconnect at logon, the mapping will happen automatically every time you start your computer. Otherwise, you'll have to map it manually every time.
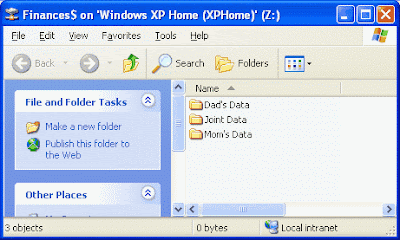
Click Finish. The mapped drive is connected and appears in a new window. It's also available in My Computer.
You can also access it using Start--->Run---> \\XPHome
*XPHome should be replaced by the name of your computer
Labels: Windows corner...
Monday, November 2, 2009

The My Recent Documents folder on the Windows XP Start menu displays a list of files and documents that you most recently used.
Removing the Recent Documents link from XP Start Menu
To remove the My Recent Documents folder from XP Start Menu, try this:
- Right-click Start, and then click Properties
- Click Customize
- Click the Advanced tab
- Under Recent documents, uncheck List my most recently opened documents
- Click OK, and then OK.
Equivalent registry value
- Open Registry Editor and navigate to:
HKEY_CURRENT_USER \ Software \ Microsoft \ Windows \ CurrentVersion \ Explorer \ Advanced
- Backup the key to a file. See Backing up.. article
- Set the value of Start_ShowRecentDocs accordingly.
Value of 0 - List my most recently opened documents is disabled
Value of 2 - List my most recently opened documents is enabled
Automate the above with REG file
Download this REG file sets Start_ShowRecentDocs registry value to 0
Undo REG file which sets Start_ShowRecentDocs registry value to 2 (default)
Different setting for the Windows Classic Start Menu
For the Classic Start Menu, set NoRecentDocsMenu to 1 in this key:
HKEY_CURRENT_USER \ Software \ Microsoft \ Windows \ CurrentVersion \ Policies \ Explorer
NoRecentDocsMenu value may not exist by default. If so, create a new value of type REG_DWORD and set it's data to 1
Labels: Windows corner...
Sunday, October 11, 2009
You can switch users without going through the Welcome screen: From Task Manager, go to the Users tab, right-click a user, and select Connect.
---------------------------------------------------------------
Hold down the shift key in the shutdown dialog to change "Stand By" to "Hibernate". Or just press H to hibernate instantly. You can even use the Power Control Panel to configure your power button to hibernate.
---------------------------------------------------------------
To disable the password when resuming from standby or hibernation, open the Power Control Panel and uncheck "Prompt for password after returning from standby" on the Advanced tab.
---------------------------------------------------------------
You can rename multiple files all at once: Select a group of files, right-click the first file, and select "Rename". Type in a name for the first file, and the rest will follow.
---------------------------------------------------------------
Hold down the shift key when switching to thumbnail view to hide the file names. Do it again to bring them back.
---------------------------------------------------------------
When dragging a file in Explorer, you can control the operation that will be performed when you release the mouse button:
Hold the Control Key to force a Copy.
Hold the Shift key to force a Move.
Hold the Alt key to force a Create Shortcut.
---------------------------------------------------------------
If you create a file called Folder.jpg, that image will be used as the thumbnail for the folder. What's more, that image will also be used as the album art in Windows Media Player for all media files in that folder.
---------------------------------------------------------------
From the View Menu, select "Choose Details" to select which file properties should be shown in the Explorer window. To sort by a file property, check its name in the "Choose Details" in order to make that property available in the "Arrange Icons by" menu.
---------------------------------------------------------------
To display the volume control icon in the taskbar, go to the Sounds and Audio Devices Control Panel and select "Place volume icon in the taskbar".
---------------------------------------------------------------
Hold down the shift key when deleting a file to delete it immediately instead of placing it in the Recycle Bin. Files deleted in this way cannot be restored.
---------------------------------------------------------------
If you hold down the shift key while clicking "No" in a Confirm File Operation dialog, the response will be interpreted as "No to All".
---------------------------------------------------------------
To save a document with an extension other than the one a program wants to use, enclose the entire name in quotation makes. For example, if you run Notepad and save a file under the name:
Dr.Z
it will actually be saved under the name Dr.Z.txt
But if you type:
"Dr.Z"
then the document will be saved under the name:
Dr.Z
(Note that a document so-named cannot be opened via double-clicking since the extension is no longer ".txt").
---------------------------------------------------------------
Put a shortcut to your favorite editor in your Send To folder and it will appear in your "Send To" menu. You can then right-click any file and send it to your editor.
Ctrl+Shift+Escape will launch Task Manager.
---------------------------------------------------------------
To arrange two windows side-by-side, switch to the first window, then hold the Control key while right-clicking the taskbar button of the second window. Select "Tile Vertically".
---------------------------------------------------------------
To close several windows at once, hold down the Control key while clicking on the taskbar buttons of each window. Once you have selected all the windows you want to close, right-click the last button you selected and pick "Close Group".
---------------------------------------------------------------
You can turn a folder into a desktop toolbar by dragging the icon of the desired folder to the edge of the screen. You can then turn it into a floating toolbar by dragging it from the edge of the screen into the middle of the screen. (It helps if you minimize all application windows first.)
---------------------------------------------------------------
You can turn a folder into a taskbar toolbar. First, unlock your taskbar. Next drag the icon of the desired folder to the space between the taskbar buttons and the clock. (Wait for the no-entry cursor to change to an arrow. It's a very tiny space; you will have to hunt for it.) You can rearrange and resize the taskbar toolbar you just created. You can even turn the taskbar toolbar into a menu by resizing it until only its name is visible.
---------------------------------------------------------------
In the Address Bar, type a domain name like "microsoft" an hit Ctrl+Enter. Internet Explorer autmatically inserts the "http://www." and the ".com" for you.
---------------------------------------------------------------
To remove an AutoComplete entry from a Web form, highlight the item in the AutoComplete dropdown and press the Delete key. To remove all Web form AutoComplete entries, go to the Internet Explorer Tools menu, select Internet Options, Content, AutoComplete, then press the "Clear Forms" button.
---------------------------------------------------------------
To organize your Favorites in Explorer instead of using the Organize Favorites dialog, hold the shift key while selecting "Organize Favorites" from the Favorites menu of an Explorer window.
---------------------------------------------------------------
You can organize your Favorites by dragging the items around your Favorites menu. Alternatively, you can open the Favorites pane and hold the Alt key while pressing the up and down arrows to change the order of your Favorites.
---------------------------------------------------------------
To run Internet Explorer fullscreen, press F11. Press it again to return to normal mode.
---------------------------------------------------------------
To add or remove columns from the Details mode, select Choose Details from the View m menu, or just right-click the column header bar.
---------------------------------------------------------------
In Internet Explorer, hold the Shift key while turning the mouse wheel to go forwards or backwards.
In Internet Explorer, hold the Shift key while clicking on a link to open the Web page in a new window.
In Internet Explorer, type Ctrl+D to add the current page to your Favorites. This and many more keyboard shortcuts can be found by going to Internet Explorer, clicking the Help menu, then selecting Contents and Index. From the table of contents, open Accessibility and click "Using Internet Explorer keyboard shortcuts".
---------------------------------------------------------------
Labels: Windows corner...
Wednesday, August 26, 2009
Labels: Windows corner...
Sunday, June 21, 2009
My laptop had been infected for long by a virus. I had identified it to be the recycler virus couple of weeks ago. But I had never really been trying to remove it. Yesterday evening, the virus had started virtual memory hijacking (ie., loading more memory for other processes). I could not bear it any longer.
So I started to search about the recycler virus. And I have made a small tutorial on the steps to remove the virus.
Goto your drive(in command promt C:\ or D:\)
Type ATTRIB -S -A -H -R.
2. Ensure that you are able to see hidden files by going to Tool>Folder Option>view and checking off hidden files.
3. System Volume Information and Recycler should be visible in your root drive (c: d: or whatever drive you use) .
4. Go to your drive and right click on RECYCLER folder and click delete.It was not deleted in my case, since it was being used by some other process. Force del is a useful application to override this error and delete the folder.
5. Right Click on System volume information folder and go to Properties. Go to the tab labeled Security, If your user name is not there then add your username that you use for XP . Give yourself all security rights as well as the SYSTEM user. Then press okay. If you cannot see the security tab and you are using XP professional then go to Tool>Folder Option>View uncheck box "Use simple File sharing" then select Apply.
If you have no clue of what step 5 was, there's a simpler way of doing it.
- Click Start, click Run, type cmd, and then click OK.
- Make sure that you are in the root folder of the partition for which you want to gain access to the System Volume Information folder. For example, to gain access the C:\System Volume Information folder, make sure that you are in the root folder of drive C (at a "C:\" prompt).
- Type the following line, and then press ENTER: cacls "driveletter:\System Volume Information" /E /G username:FMake sure to type the quotation marks as indicated. This command adds the specified user to the folder with Full Control permissions.
- Double-click the System Volume Information folder in the root folder to open it.
- If you need to remove the permissions after troubleshooting, type the following line at a command prompt: cacls "driveletter:\System Volume Information" /E /R usernameThis command removes all permissions for the specified user.
6. Go to the recycle bin the desktop and right click. Choose properties then check the box " Do not move files to the recycle bin. Remove files immediately when deleted." Press Apply.
7. Go to the System Volume Information folder and delete the last folder. These folders are where Xp has taken a snapshot of your system in order to restore it. The virus is hiding here in the event that you restore it is also restored. If you are sure which folder to delete, don't worry. Deleting all the folders in System Volume Information will just delete all the restoration points.
8. You should now open the registry editor and remove the virus from here so that when you restart the virus is not recreated.
9. Open the registry editor. Start >Run> then type regedit in the box and select OK The registry will now open.
10. Hit Ctrl+F Type Recycler (iuhi64 should also be searched) in the search box . Delete the entry when found. Press F3 to find the next occurrance of Recycler(iuhi64) and delete.
11. Close regedit.
12. Go to all installed harddrives and so steps 2- steps 6, steps 8 and steps 9.
13. Run your virus software. You should be able to update any virus software that was previously unupdatable.
14. Restart your computer
15. Verify that that the reycler folder is deleted from you root drive.
16. Then you can uncheck the box in the recycle bin that you checked in step 6. To keep all you deleted files in case you need to restore a file that was accidentally deleted.
My findings:
This virus is recreated using the methods of the recycle bin. Everytime you delete a file it recreates itself because it looks in the recycle bin and restores or copies the virus information inside. If the virus is not able to be stored inside and is immediately removed when you check the box in step 6. Then it cannot recreate itself and all of its power is lost. So erasing it from the registry and drive ensures that it cannot return. It has two copies one in the recyler folder and another one in system volume information. Deleting both the folders does the trick.
http://wiki.answers.com/Q/How_do_you_remove_recycler_virus_found_in_hard_disk
http://www.winmatrix.com/forums/index.php?showtopic=13021
http://support.microsoft.com/
These were the three most useful links for me to understand about the recycler virus and delete it.
Spending an evening with the virus ensured that, my laptop was free of recycler virus.
Labels: Windows corner..., World of virus
Monday, April 13, 2009
How to have different headers for different pages in the Same word document?
0 comments Posted by Deepak at 6:05 PMIt' pretty simple, Page Layout--->Break--->Section Break-->Next page.
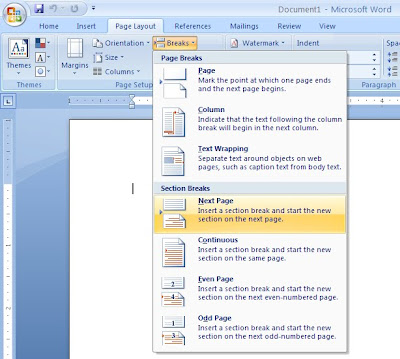
Now in header, the link to previous check box becomes enabled. By unchecking it, I could have different headers for different pages.
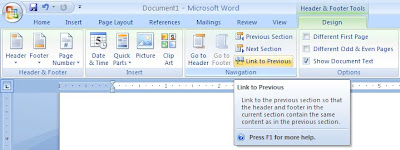
Hope it was useful, if you were toying with so many complicated ideas instead of having different headers!
Labels: Windows corner..., Word Tips
Tuesday, April 7, 2009
Labels: Adobe Photoshop, Windows corner...
Tuesday, March 3, 2009

Here's a trick which allows you to use any folder as a drive in Windows. This trick comes very handy when you use a particular folder often, and want to quickly access it like in Command Prompt. It actually adds a new drive in My Computer with your specified drive letter(whatever you specify) and that drive actually points to your designated folder. Once you open the drive, you can access the folder.
The DOS command SUBST is used to create a virtual drive allowing you to add any file path and used as a drive.
SUBST [drive1: [drive2:]path]
drive1: Specifies a virtual drive to which you want to assign a path.
drive2: Specifies a physical drive and path you want to assign to a virtual drive.
For example, to create a virtual drive with a specified path:
- Find a folder you want to use as a drive and remember its path. For demonstration i will be using ‘H:\sd’ as the path.
- Open Command Prompt and type “subst drive-letter path”
- For example, type “subst z: H:\sd” and press Enter.
Article idea: http://system-hacks.blogspot.com/2008/08/converting-folder-into-drive.html
Labels: Windows corner...
Saturday, October 11, 2008
1. Ctrl + Shift + A All Caps
2. Alt + Ctrl + 1 ApplyHeading1
3. Alt + Ctrl + 2 ApplyHeading2
4. Alt + Ctrl + 3 ApplyHeading3
5. Ctrl + Shift + L Apply List Bullet
6. Alt + F10 App Maximize
7. Alt + F5 App Restore
8. Ctrl+B Bold
9. Ctrl + PgDn Browse Next
10. Ctrl + PgUp Browse Previous
11. Alt + Ctrl + Home Browse Select
12. Esc Cancel
13. Ctrl+E Center Paragraph
14. Shift+F3 Change Case
15. Left arrow Character Left
16. Shift + Left arrow Character Left Extend
17. Right arrow Character Right
18. Shift + Right arrow Character Right Extend
19. Alt + Shift + C Close Pane
20. Alt+Drag (or press Ctrl + Shift + F8 and drag) Column Select
21. Ctrl +Shift+C Copy Format
22. Shift + F2 Copy Text
23. Alt + F3 Create AutoText
24. Ctrl+ Backspace Delete Back Word
25. Ctrl + Del Delete Word
26. Ctrl+W, Ctrl+F4 Document Close
27. Ctrl + F10 Document Maximize
28. Ctrl + F7 Document Move
29. Ctrl + F5 Document Restore
30. Ctrl + F8 Document Size
31. Alt + Ctrl + S Document Split
32. Alt + Shift + F9 Do Field Click
33. Ctrl + Shift + D Double Underline
34. Alt R, G Draw Group
35. Alt R, I Draw Snap To Grid
36. Alt R, U Draw Ungroup
37. Ctrl+Shift+F5 (Or: Alt I, K) Edit Bookmark
38. Del Edit Clear
39. Ctrl+C Edit Copy
40. Ctrl+X Edit Cut
41. Ctrl+F Edit Find
42. F5, Ctrl+G Edit Go To
43. Alt E, K Edit Links
44. Ctrl+V Edit Paste
45. Alt E, S Edit Paste Special Inserts the Clipboard contents as a linked object, embedded object, or other format
46. Alt + Shift + Backspce Edit Redo
47. F4 Edit Redo Or Repeat
48. Ctrl+H Edit Replace
49. Ctrl+A Edit Select
50. Ctrl+Z Edit Undo
51. Alt + PageDn (to select to end of column, use Alt + Shift + PgDn) End Of Column
52. Ctrl+Shift+End End Of Document Extend
53. Ctrl+End End Of Document
54. End End Of Line
55. Shift+End End Of Line
56. Alt+End End Of Row
57. Alt + Ctrl + PgDn End Of Window
58. Shift + Alt + Ctrl + PgDn End Of Window
59. F8 (press Esc to turn off) Extend Selection
60. Alt + F4 File Close Or Exit
61. Ctrl+N File New Default
62. Ctrl+O File Open
63. Alt F, U File Page Setup
64. Ctrl + P File Print
65. Ctrl+F2 File Print
66. Alt F, I File Properties
67. Ctrl+S File Save
68. Alt F, A (or F12) File SaveAs
69. Ctrl+Shift+F Font
70. Alt I, L Insert File
71. Ctrl+Shift+P Font Size
72. Alt + Ctrl + K Format AutoFormat
73. Alt O, B Format Borders And Shading
74. Alt O, E Format Change Case
75. Alt O, C Format Columns
76. Alt O, D Format Drop Caps
77. Ctrl+D Format Font
78. Alt + Shift + R Format Header Footer
79. Alt O, P Format Paragraph
80. Alt O, S Format Style
81. Alt O, T Format Tabs
82. Shift + F5 Go Back
83. Ctrl + > Grow Font
84. Ctrl + ] Grow Font One Point
85. Ctrl + T (or drag the ruler) Hanging Indent
86. F1 Help
87. Shift + F1 Help Tool
88. Ctrl + Shift + H Hidden
89. Ctrl +Click on it Hyperlink Open
90. Ctrl + M (or drag the ruler) Indent
91. Alt + Ctrl + M (or Alt I, M) Insert Annotation
92. F3 Insert AutoText
93. Alt I, B Insert Break
94. Alt I, C Insert Caption
95. Ctrl + Shift + Return Insert Column Break
96. Alt + Shift + D Insert Date Field
97. Alt + Ctrl + D Insert End
98. Alt I, F Insert Field
99. Ctrl+F9 Insert Field Characters
Article idea: http://c-n-k.blogspot.com/2008/10/few-shortcuts-used-frequently-in.html
Labels: Windows corner...
Sunday, August 3, 2008
If you work on windows, you know that shutting it down can be really a hassle and time taking, especially when a lot of programs are running. Most of us tend to avoid shut down due to this reason but we know that shut down is always safer and also considered good for the pc.
There are a lot of shut down tricks and tools available, which help you to achieve a smooth and fast shut down of windows without negatively affecting your pc. However this trick, is probably the simplest one and also the fastest way to shut down your pc.
Here are the steps:
1. Press Ctrl+Alt+Delete to go to the Task Manager .
2. Click on Shut Down on the Top .
3. Highlight ‘ Turn Off ‘ and while holding down the Ctrl key, click on it .
And thats it!
Just count 1, 2, 3…5 and there you go…your pc is off !
I have tried this trick on my XP system and it has worked everytime and hasn’t negatively affected my pc. I haven’t tried this on any other version of Windows but I think it’ll work.
However I advise you to use this trick only when you are in a rush and you need a speedy shut down of your pc.
Labels: Windows corner...
Tuesday, June 24, 2008
Labels: Windows corner...
Sunday, March 30, 2008

This post is about how to lock the folder with maximum security.Once you lock your folder,you can't find it anywhere in your system until you unlock it.
First paste the following code in your notepad
cls
@ECHO OFF
title Folder Locker
if EXIST "Control Panel.{21EC2020-3AEA-1069-A2DD-08002B30309D}" goto UNLOCK
if NOT EXIST Locker goto MDLOCKER
:CONFIRM
echo Are you sure u want to Lock the folder(Y/N)
set/p "cho=>"
if %cho%==Y goto LOCK
if %cho%==y goto LOCK
if %cho%==n goto END
if %cho%==N goto END
echo Invalid choice.
goto CONFIRM
:LOCK
ren Locker "Control Panel.{21EC2020-3AEA-1069-A2DD-08002B30309D}"
attrib +h +s "Control Panel.{21EC2020-3AEA-1069-A2DD-08002B30309D}"
echo Folder locked
goto End
:UNLOCK
echo Enter password to Unlock folder
set/p "pass=>"
if NOT %pass%==type your password here goto FAIL
attrib -h -s "Control Panel.{21EC2020-3AEA-1069-A2DD-08002B30309D}"
ren "Control Panel.{21EC2020-3AEA-1069-A2DD-08002B30309D}" Locker
echo Folder Unlocked successfully
goto End
:FAIL
echo Invalid password
goto end
:MDLOCKER
md Locker
echo Locker created successfully
goto End
:End
save this as a batch file .
ie., filename.bat
Click the batch file and run it.
A new folder called locker will be created.
Keep the files that you want to be locked inside the locker folder and again open that batch file. It will ask whether to lock yes or no.You press Y .
The locker folder will become hidden. So you have locked the folder!!!
Now to open it right click the batch file and select the Edit option and see for these wordings
"if NOT %pass%==type your password here goto FAIL"
alter this as
" if NOT %pass%==((your password)) goto FAIL"
Then you can again get the folder visible!!!
Labels: Windows corner...
Thursday, March 27, 2008
Follow these steps to hide disk drives...
1.Open Registry and navigate to "HKEY_CURRENT_USER\Software\Microsoft\Windows\CurrentVersion\policies\Explorer".
2.Create a new entry by clicking on edit-> new->"Dword value". Name the value as 3fffffff.Now each drive letter has a number.
3.The value of the key will be the sum of the drive letter numbers. Some of the numbers are :
A:=1, B:=2,C:\4,D:=8,e:=16,f:=32,g:=64,H:=128,I:=256,j:=512,k:=1024,L:=2048 and so on. .....
4.Now if you want to hide "C:" and "D:" , you just have to enter value as '12'(4+8). Enter as decimal value in the dword key and restart windows.
5.To get back your drives just delete the key called "3fffffff".
Aeticle idea:http://www.computerlords.blogspot.com/
Labels: Windows corner...


