Friday, December 7, 2007
This is a seldom used Windows XP feature that is sure to come in handy (probably when you least suspect it). I’m referring to Mousekeys, which when activated allows you to navigate the mouse cursor using the arrow keys on your keyboard. This type of knowledge can definitely help you out if you are ever in a situation where the mouse is inoperable.
Here's wat is to be done....
On your Keyboard Press the following Keys at the same time:
Left SHIFT + ALT + NUM LOCK 

Click ok, the Mousekeys will. Once the Mousekeys is running simply use the arrow keys located on your numeric keypad (8 is up, 2 is down, 4 is left, and 6 is right).
To move the cursor simply tap on the arrows in the numeric keypad (if you hold down one of the arrows, it will move the cursor faster).
You will probably notice that the cursor moves incredibly slow, so one other thing I do is, when I open Mousekeys, I go into the Settings and adjust the speed all the way up. You can find it in the control panel.
Here is what you need to know to navigate with Mousekeys:
- To move up, tap or hold down the 8 key on your numeric keypad
- To move down, tap or hold down the 2 key on your numeric keypad
- To move right, tap or hold down the 6 key on your numeric keypad
- To move left, tap or hold down the 4 key on your numeric keypad
- To Click on something, Hit the 5 key on your numeric keypad
- To double-click, press the plus sign (+) on your numeric keypad
- To right-click, press the minus sign (-) on your numeric keypad
- To drag something, move the cursor to the item you want to drag then press the Insert key. Then to release the item hit the Delete key.
I think you would have found this post very useful.
Article idea:http://system-hacks.blogspot.com/2007/11/use-your-keyboard-as-mouse.html
Thursday, December 6, 2007

2.Create a new DWORD called MaxConnectionsPerServer
3.Set the value for DWORD = 000000a
4.Create another new DWORD called MaxConnectionsPer1_0Server
5.Also set the value of this DWORD = 0000000a
Note 2: Hex 0000000a = Decimal 10
2.Should you add a value, or modify an existing setting?
Answer: Create a new dword set the value = 0000000a
3.Is MaxConnectionsPerServer a String Value or a DWORD?
Thursday, November 29, 2007

If you want to disable the ability to use the F3 key from either the Windows Explorer or Internet Explorer
1.Start Regedit
2.Go to HKEY_CURRENT_USER\Software\Policies\Microsoft\Internet Explorer\Restrictions
3.Create a Dword value called NoFindFiles
4.Give it a value of 1
5.Reboot
Though I would not suggest you doing this...
I posted it because it is long time since i posted on registry hacking....
And to show that you can explore the registry to find more hacks....
Monday, November 12, 2007
Saturday, November 10, 2007
If windows key +L seems like too much of a hassle, try this instead.
1.. Right click an empty spot on the desktop, point to New and click Shortcut.
2.. In the Create Shortcut dialog box, type the following into the Type the location of the item text box: rundll32 user32.dll,LockWorkStation
3.. Click Next.
4.. In the Select a Title for the Program dialog box, type Lock the Desktop in the Type a name for this shortcut text box. Click Finish.
Now the desktop will lock when you click your new Lock the Desktop icon.
Note:
1.This post is for mouse-lovers!!!
2.ctrl+shift+esc=ctrl+alt+del!!!
Think different!Act smart!

Windows key + D = Moves to desktop
Windows key + E = Starts Windows Explorer
Windows key + F = Finds files or folders
Windows key + CTRL + F = Finds a computer
Windows key+L =Locks the screen.
Windows key + M = Minimizes all windows
Windows key + Shift + M = Undoes minimize all windows
Windows key + R = Displays the Run dialog box
Windows key + Tab = Cycles through the taskbar buttons
Windows key + Break = Displays the System Properties sheet

Add both Renamme & Delete to the menu, change Attributes to 70,01,00,20
Restore the Recycle Bin to Windows defaults including un-deleting the icon after deletion, go to
To Restore the icon, go to HKEY_LOCAL_MACHINE\SOFTWARE\Microsoft\Windows\CurrentVersion\explorer\Desktop\NameSpace\{645FF040-5081-101B-9F08-00AA002F954E} and add a key named Recycle Bin
To reset Windows defaults, go to HKEY_CLASSES_ROOT\CLSID\{645FF040-5081-101B-9F08-00AA002F954E}\ShellFolder and change Attributes to 40 01 00 20
And some more practically useless edits to the context menu go to HKEY_CLASSES_ROOT\CLSID\{645FF040-5081-101B-9F08-00AA002F954E}\ShellFolder
Add Copy to the menu, change Attributes to 41 01 00 20
Add Cut to the menu, change Attributes to 42 01 00 20
Add Copy & Cut to the menu, change Attributes to 43 01 00 20
Add Paste to the menu, change Attributes to 44 01 00 20
Add Copy & Paste to the menu, change Attributes to 45 01 00 20
Add Cut & Paste to the menu, change Attributes to 46 01 00 20
Add all Cut, Copy & Paste to the menu, change Attributes to 47 01 00 20
The above edits are more to the fun side than useful but the Rename & Delete can be quite useful sometimes. You don't have to worry about deleting it since you can always call it back.
Friday, November 9, 2007
However, both these approaches can prove to be counter-productives as your staff can no longer use USB keyboards, wireless mouse, digital cameras, camcorders, scanners, printers or even USB microphones to their computers.
Open the Windows Registry and open the following key
HKEY_LOCAL_MACHINE\System\CurrentControlSet\ Control\StorageDevicePolicies
Now add a new DWORD called WriteProtect and put the value as 0 to disable write privileges to the USB port. To reverse the step, either delete the WriteProtect REG_DWORD or toggle the value to 1 which will enable the port.
Remember that the above trick works only with Windows XP SP2.
If you like to go a step further and disable users from connecting USB storage devices to their computers, here's the trick:
Open registry and navigate to the following registry key:
HKEY_LOCAL_MACHINE\SYSTEM\CurrentControlSet \Services\UsbStor
Now in the right pane, double-click Start and type 4 in the Value data box (Hexadecimal) and quite the registry editor. To enable the USB storage devices, change the Start value back to 3.
No matter how good the protection tricks are, determined people always find workarounds. Here are some of the tricks that may render the above methods unusable:
» Employee may boot computer using a LiveCD like Knoppix or Ubuntu so the USB drives are again available to him for writing.
» They could open the computer chasis, take the battery out to reset the BIOS settings.
» Some may even invest in a PS2 to USB port converter.
» If he manages to get admin access for a temporary period (like installing software), he may undo the registry edits.
The cat-mouse game will never end. USB drives will remain a headache for the sysadmins for some time. However, Windows Vista will make life much simpler for IT administrators. There's a new Policy in Vista that allows USB keyboards or mouse to be used but not any USB devices.
Saturday, October 27, 2007
Well,though I said I will be in hibernation state,I could not resist this post.
Because,this would be a very useful post all the windows-xp users out there!!!!
To be plain and simple,
It converts your xp interface into vista interface.
It is not like an ordinary theme you download.
It is a completely tranformation.
Welcome Screen / Logon Screen
New msstyles files (visual styles)
New desktop and file icons
New toolbar icons
Progress Dialogs
Sounds scheme
System Tray icons
New Wallpapers
Windows Media Player Skins
 DESKTIOP- Before transformation
 DESKTOP-Vista Tranformed interface
Desktop Screenshot (It’s outstanding)
There is a sidebar called Thoosje sidebar which comes as a bonus with this tranformation pack.It is a very useful sidebar.You have many plugins into this sidebar.You do see the side bar in the above picture.Further,the thumbnails for each minimized window is a cool idea,I just love this transformation pack.
Why wait?just download and experience this tranformation.


Do you want to download this vista tranformation pack??
Once you download this 31.96 MB software and use it,you will accept my blog title definitely!!!
Tuesday, October 23, 2007
Last week my cousin came to my home.He was 4 years old....
He wanted to use with my computer...
I allowed....
When I returned after attending a call.....
I was bewildered.....

This is how my desktop looked :-(
I couldn't find how he managed to change (some) setting. Re-starting Windows didn't help. My friend helped me.
Steps to fix "tilted Windows":
*Right click on the Desktop
*Choose the "Graphics Options" menu
*Choose the "Graphics Properties..." submenu
*In the dialog box, choose the "Rotation" tab
*In the "Rotation Views", choose "Normal" (my cousin somehow managed to change this as "180 Degree"!)
For some reason, my friend was able to make it "Normal" and immediately view the change, I had to re-boot! Anyway, now it is "Normal".

Saturday, October 20, 2007
Here i have posted some shortcut keys and their functions.You should have known all these shorcuts except a few......

CTRL+C Copy.
---------------
CTRL+X Cut.
---------------
CTRL+V Paste.
---------------
CTRL+Z Undo.
---------------
DELETE Delete.
----------------
SHIFT+DELETE Delete selected item permanently without placing the item in the Recycle
Bin.
-----------------
CTRL while dragging an item Copy selected item.
-----------------
CTRL+SHIFT while dragging an item Create shortcut to selected item.
------------------
F2 Rename selected item.
---------------------
CTRL+RIGHT ARROW Move the insertion point to the beginning of the next word.
-----------------------
CTRL+LEFT ARROW Move the insertion point to the beginning of the previous word.
-------------------------
CTRL+DOWN ARROW Move the insertion point to the beginning of the next paragraph.
-----------------------------
CTRL+UP ARROW Move the insertion point to the beginning of the previous paragraph.
------------------------------
CTRL+SHIFT with any of the arrow keys Highlight a block of text.
---------------------------------
SHIFT with any of the arrow keys Select more than one item in a window or on the
desktop, or select text within a document.
-----------------------------------
CTRL+A Select all.
--------------------------------------
F3 Search for a file or folder.
-------------------------------------
ALT+ENTER View properties for the selected item.
--------------------------------------------
ALT+F4 Close the active item, or quit the active program.
------------------------------
ALT+Enter Displays the properties of the selected object.
---------------------------------
ALT+SPACEBAR Opens the shortcut menu for the active window.
----------------------------------
CTRL+F4 Close the active document in programs that allow you to have multiple
documents open simultaneously.
-------------------------------------------
ALT+TAB Switch between open items.
-----------------------------------------
ALT+ESC Cycle through items in the order they were opened.
--------------------------------------------------------------
F6 Cycle through screen elements in a window or on the desktop
--------------------------------------------------------------------.
F4 Display the Address bar list in My Computer or Windows Explorer.
-------------------------------------------------------------------
SHIFT+F10 Display the shortcut menu for the selected item.
-------------------------------------------------------------------
ALT+SPACEBAR Display the System menu for the active window.
-------------------------------------------------------------------
CTRL+ESC Display the Start menu.
------------------------------------
ALT+Underlined letter in a menu name Display the corresponding menu.
--------------------------------------------
Underlined letter in a command name on an open menu Carry out the corresponding
command.
-----------------------------------------------
F10 Activate the menu bar in the active program.
--------------------------------------------------------
RIGHT ARROW Open the next menu to the right, or open a submenu.
-----------------------------------------------------
LEFT ARROW Open the next menu to the left, or close a submenu.
----------------------------------------------------
F5 Refresh the active window.
------------------------------------------
BACKSPACE View the folder one level up in My Computer or Windows Explorer.
--------------------------------------------
ESC Cancel the current task.
----------------------------------------------
SHIFT when you insert a CD into the CD-ROM drive Prevent the CD from automatically
playing.
----------------------------------------------
WINDOWS+D To reach desktop from the file you are in.
-----------------------------------------------
WINDOWS+E Opens the explorere
How to open your URLs without manually opening your browser
Select "Start Run"
Type your URL (http://www.google.com for example) and press ENTER.
Fastest way to add items to your Start Menu
Drag and drop your file, folder, or shortcut on the "Start" button!
How to get IP inforamtion
Go to the "DOS Prompt" or the "Command Prompt"
Type:ipconfig /all
Does ESCAPE really let you escape?
Don't over look the simple ESCAPE key. Among other things,
You can use ESCAPE to abort a drag (drag and drop).
You can also use ESCAPE to abort a task switching (ALT+TAB).
Drag and view
You can use Paint Brush to easily view bitmaps (without double clicking on a bitmap or opening it from the Paint Brush):
Simply drag (from the Windows Explorer, File Manager, or Folder) and drop the bitmap on the Paint Brush.
Dragging and dropping objects between full screen applications
It's very easy to drag and drop objects between programs as long as the target program is not covered by another program.
Here's a way to drop objects on programs that are hiding behind other programs:
Drag the object over to your target program's icon in the task bar, but don't drop it quite yet.
Wait a few seconds until Windows automatically opens the target program (which used to be hidden) for you, and drop the object as usual.
Run Explorer from the command prompt and make it open a specified directory
You can make the Windows Explorer open to a directory of your choice from the "DOS/Command Prompt" by using the Start command.
At the command prompt, type
Start
and press ENTER. For example:
Start c:\temp
Copying data from DOS / console mode program screens
If you're still using DOS or console mode (also refereed to as character mode) programs that doesn't provide a way to export data, you maybe looking for a way to capture what's displayed on such programs. Try this:
Start a DOS box or a Command Prompt (DOS box) inside Windows.
"Start Programs Command Prompt / DOS"
Run the character mode program that you want to import data from, and go to the screen with the data you want to capture.
Right click the title bar of the DOS box
Select "Edit Mark"
Click and drag the mouse until you select the data area that you want to copy. Press ENTER when you've finished selecting.
Switch to the Windows program that you want to import the just copied data to, and select its paste function.
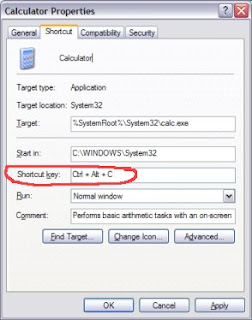
In addition to this you can add your own shortcut keys
By right clicking the icon and adding a shortcut key.
For eg.,
Friday, October 19, 2007
Right from the day I started using computer.One thing had struck me.
Why can't I delete or rename a recycle bin?
The thought occured when i deleted all icons in my desktop except the recycle bin.
This was some years back.
Then I didn't bother about it.And forgot about this.
And one day I attended a seminar.
There the person who conducted the seminar asked me this.
Immediately i googled it.
And got the solution..............
How to rename the Microsoft Windows Recycle Bin?
Here is the answer
1.Click Start / Run
2.Type regedit and press enter.
3.Open the HKEY_CLASSES_ROOT folder
4.Open the CLSID folder
5.Open the {645FF040-5081-101B-9F08-00AA002F954E} folder
6.Open the ShellFolder folder
7.Change the "Attributes" data value from "40 01 00 20" to "50 01 00 20". Once completed change the "CallForAttributes" dword value to "0x00000000" (double-click and change value data to 0). You must change both of these values to get the rename to appear.
After performing the above steps you will be able to rename the icon like any other icon.
Right-click the Recycle Bin icon on the desktop and click Rename and rename it to whatever you wish.

Exit MSN Messenger by right-clicking the MSN icon in the notification area, and selecting Exit. Add the following registry entries, both with a DWORD value of 1:
1.Open a command prompt by clicking Start/Run, then typing "command" and clicking OK.
2.Uninstall MSN Messenger by typing "rundll32 advpack.dll,LaunchINFSection %systemRoot%\INF\msmsgs.inf,BLC.Remove"
3.Uninstall the leftover installation information file by typing "rundll32 setupapi,InstallHinfSection BLC.Remove 128 %systemRoot%\INF\msmsgs.inf"

